
API Key Rotation User Guide
- AWS Automation
- AZURE Automation
- Local/OnPrem Automation
- Manual
- FAQ
We recommend using this integration pattern for automating API key rotation for consumer applications.
1. Go to Dashboard and Navigate to the "View API Credentials" section.
2. Download Toolkit using "Toolkit" button from API Key Rotation Instructions page.
Please use our API Key Rotator solution specifically tailored for AWS by downloading “API Key Rotator“ Zip (anywhere-aws-apikeyrotator-toolkit.zip) from “AWS - API Key Rotator” section.
Demo Video - API Key Rotator for AWS (This demo video provide step by step installations for API Key Rotator Step)
Installation Instructions- Please find below detailed installation instructions (already covered in demo video) for implementing our automated key rotator solution.
Installation Steps to register and initialize the Toolkit:
Please follow the steps below to rotate API Keys using the Toolkit App Lambda Extension with the API Key Rotator Lambda Function.
Step 1: Download ‘Company Details Configuration’, ‘UUID’ and ‘API Key Rotator App’ from Developer Portal
You need to have following details when configuring the Toolkit Lambda Extension and the API Key Rotator.
- Download Company Details Configuration file from “AWS - API Key Rotator” section located on the right side.
- While downloading you will be provided ToolkitUUID, please note it. The same is available in “My Integration Page“
- Download “API Key Rotator“ zip file (anywhere-aws-apikeyrotator-toolkit.zip) from “AWS - API Key Rotator” section, this zip file contains ‘index.js', ‘sampleAppsRequest.json’, 'ReadMe.md’
Step 2: Setup ‘ApiKey Rotator Function’ and Customize it according to Your Apps Configuration.
- Unzip `anywhere-aws-apikeyrotator-toolkit.zip` and use the sampleAppsRequest.json provided in the zip folder to create apps mapping JSON request.
- Follow the instructions outlined in the “_readme” section in 'sampleAppsRequest.json' file and map your apps in Secrets Manager, Parameter Store, and Lambda Environment Variables to Apigee App names.
- Once you are ready with the mapping request, navigate to your Lambda function within your AWS environment.
- Create a new Lambda function, name it something descriptive, such as “ApiKeyRotatorFunction” and attach existing role in the permissions section.
- Rename existing 'index.mjs' to 'index.js' and copy the content from the index.js file in the anywhere-apikeyrotator-toolkit.zip into your Lambda 'index.js' and deploy the function.
- Please Note: You may need to modify the index.js code accordingly, if you used any encryption methods in Secrets Manager, SSM Parameter Store, and Lambda Variables.
- You may need to increase memory and timeout settings in General configuration of the lambda function appropriatly.
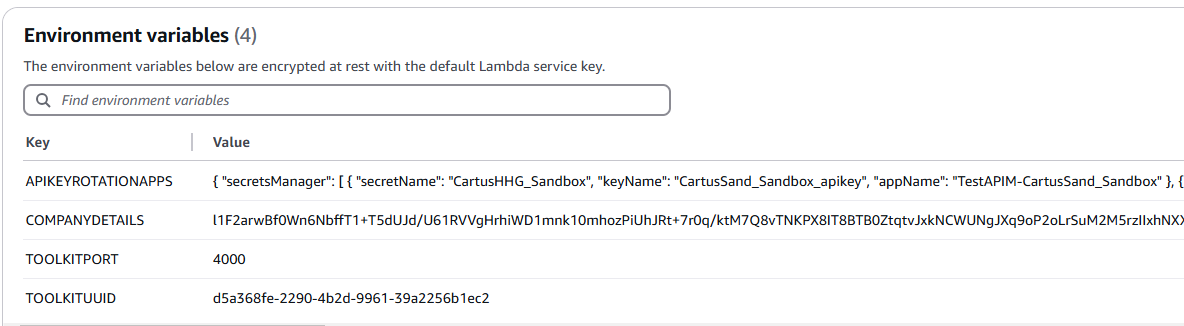
- Add the following Environment Variables to your Lambda Function:
- @ TOOLKITUUID: Input the ToolkitUUID that you copied from step 1 in the value section.
- @ COMPANYDETAILS: Paste the Company Details content that you downloaded from step 1 into the value section.
- @ TOOLKITPORT: You may select any available port; if this variable is not configured, the default port is 3000.
- @ APIKEYROTATIONAPPS: Add Your updated Apps mapping request sampleAppsRequest.json content as value.
Example screenshot:
Step 3: Configure Toolkit App Lambda Extension to your API Key Rotator Function.
- Navigate to Layer section in your Lambda Function and click on Add Layer
- Select “Specify an ARN” and enter below Lambda Extension ARN.
- US-WEST-1 > arn:aws:lambda:us-west-1:232313522912:layer:ApiKeyToolkitApp-Extension-Layer-1:1
- US-WEST-2 > arn:aws:lambda:us-west-2:232313522912:layer:ApiKeyToolkitApp-Extension-Layer-1:1
- US-EAST-1 > arn:aws:lambda:us-east-1:232313522912:layer:ApiKeyToolkitApp-Extension-Layer-1:1
- US-EAST-2 > arn:aws:lambda:us-east-2:232313522912:layer:ApiKeyToolkitApp-Extension-Layer-1:1
Simply click the "Add Layer" button. You will see the extension integrated into your function, as illustrated in the screen below.

Step 4: Configure the Lambda execution role with the necessary permissions.
- Configure the Lambda Execution Role:
- In the Configuration tab of your Lambda function, go to Permissions and find the Execution Role, and click on the role name to open it in the IAM Console.
- Click on 'add permission' and select create inline policy. In the policy editor, select JSON option and paste below IAM Policy and update 'region':'account' appropriatly, click on next and save the policy.
Note: You should have required IAM permission to update policy to the existing role. You may refer AWS link Adding and removing IAM identity permissions
Here is an example IAM policy:{ "Version": "2012-10-17", "Statement": [ { "Effect": "Allow", "Action": [ "secretsmanager:GetSecretValue", "secretsmanager:PutSecretValue", "ssm:GetParameter", "ssm:PutParameter", "lambda:GetFunctionConfiguration", "lambda:UpdateFunctionConfiguration", "kms:Decrypt" ], "Resource": [ "arn:aws:secretsmanager:${region}:${account}:secret:*", "arn:aws:ssm:${region}:${account}:parameter/*", "arn:aws:lambda:${region}:${account}:function:*" ] } ] }
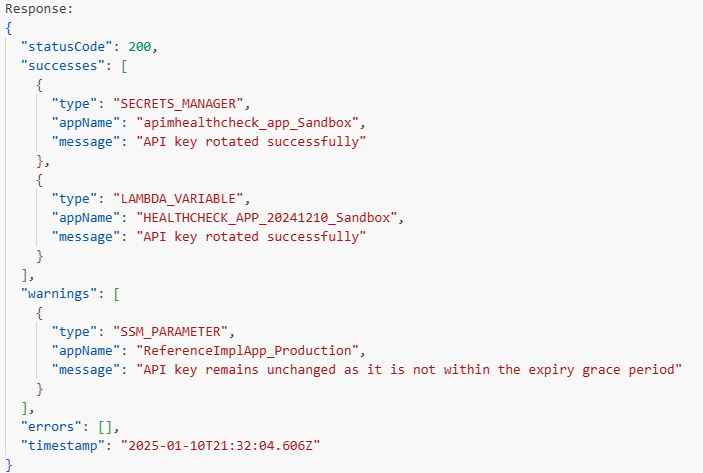
Step 5: Test API Key Rotator Function and verify logs.
- Make sure you have provided valid Apps mappings in the APIKEYROTATIONAPPS environment variable.
- Test 'ApiKeyRotatorFunction' Lambda and verify console logs. You will see logs similar to below with list of success/warnings/errors details in the response.
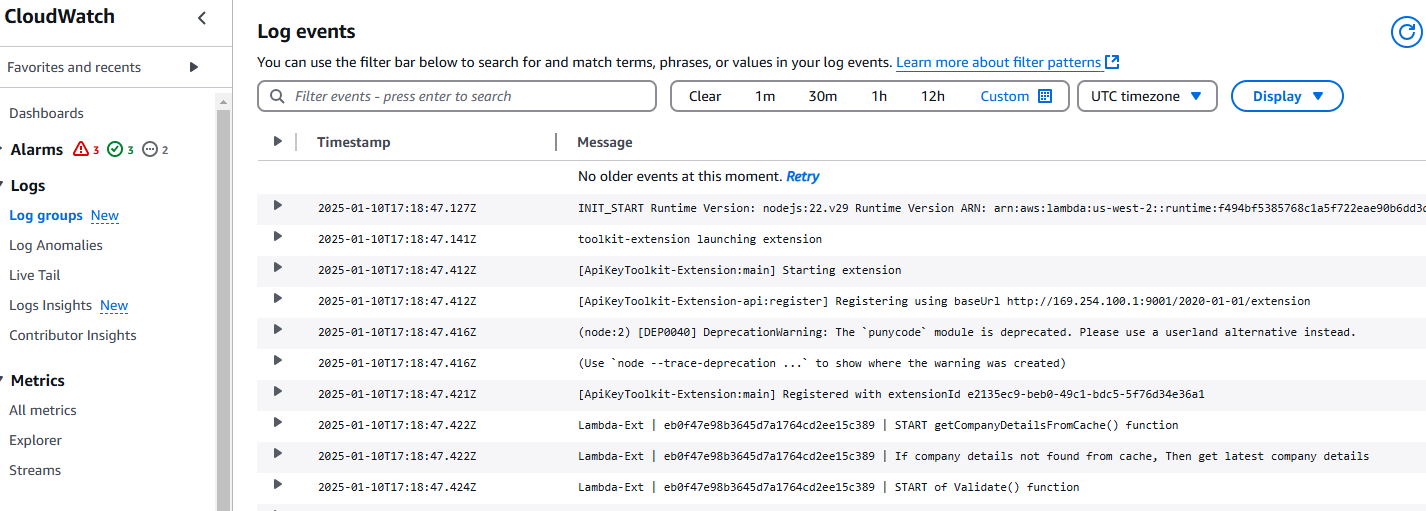
Check Console Logs (or) Cloud watch logs to view and verify
API Key Rotator App Logs & Toolkit Apps Logs
Cloud Watch Logs for Toolkit App
Step 6: Configuring the Event Bridge Scheduler to Trigger the API Key Rotator weekly once.
- Got Configuration tab and Trigger section in the Apikey Rotator Lambda function.
- Click Add Trigger and select Event Bridge
- Enter following details like shown in below screen.
- Rule Name: ApiKeyRotatorSchedular
- Description: This scheduler triggers the API Key Rotator Function every Sunday morning at 6 AM EST to rotate API keys
- Rule Type: Scheduler expression
Scheduler expression: cron(0 6 ? * 1 )
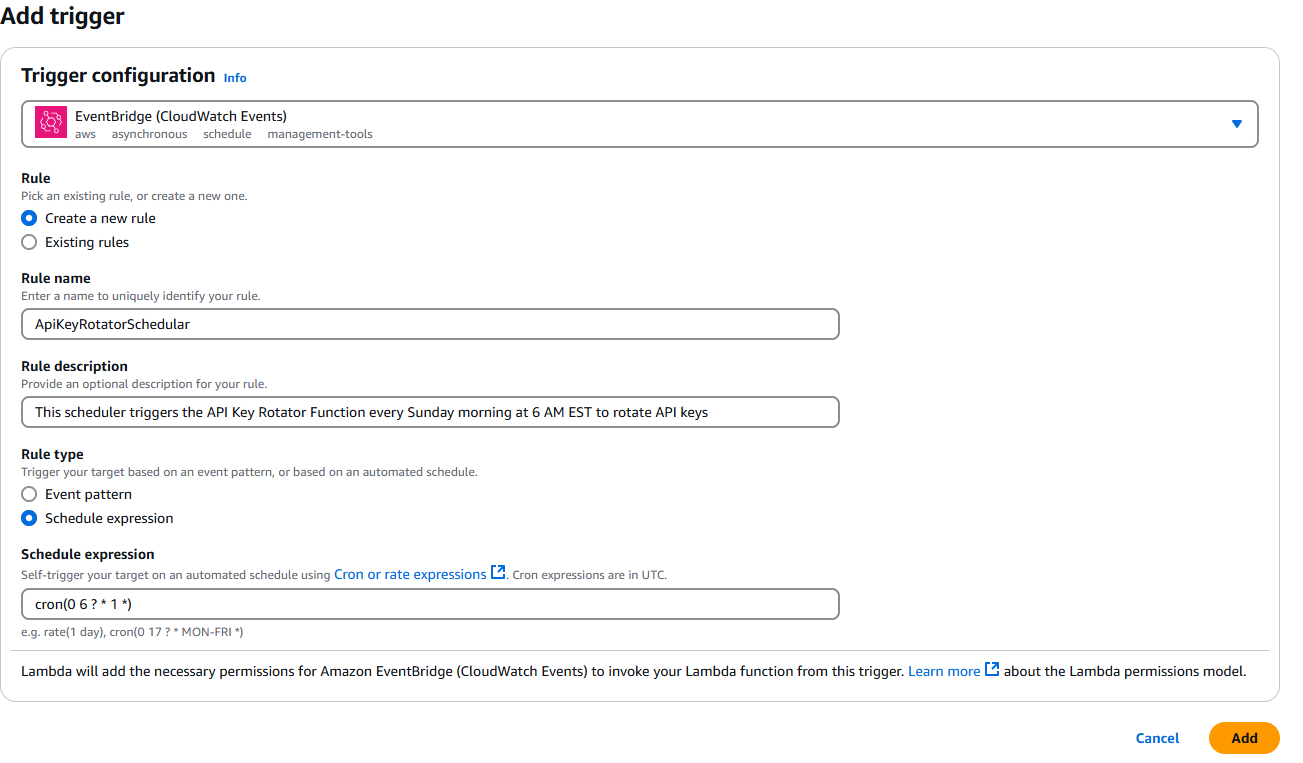
Add Trigger, it will add Apikey Rotator Scheduler Trigger to the lambda function as shown below.

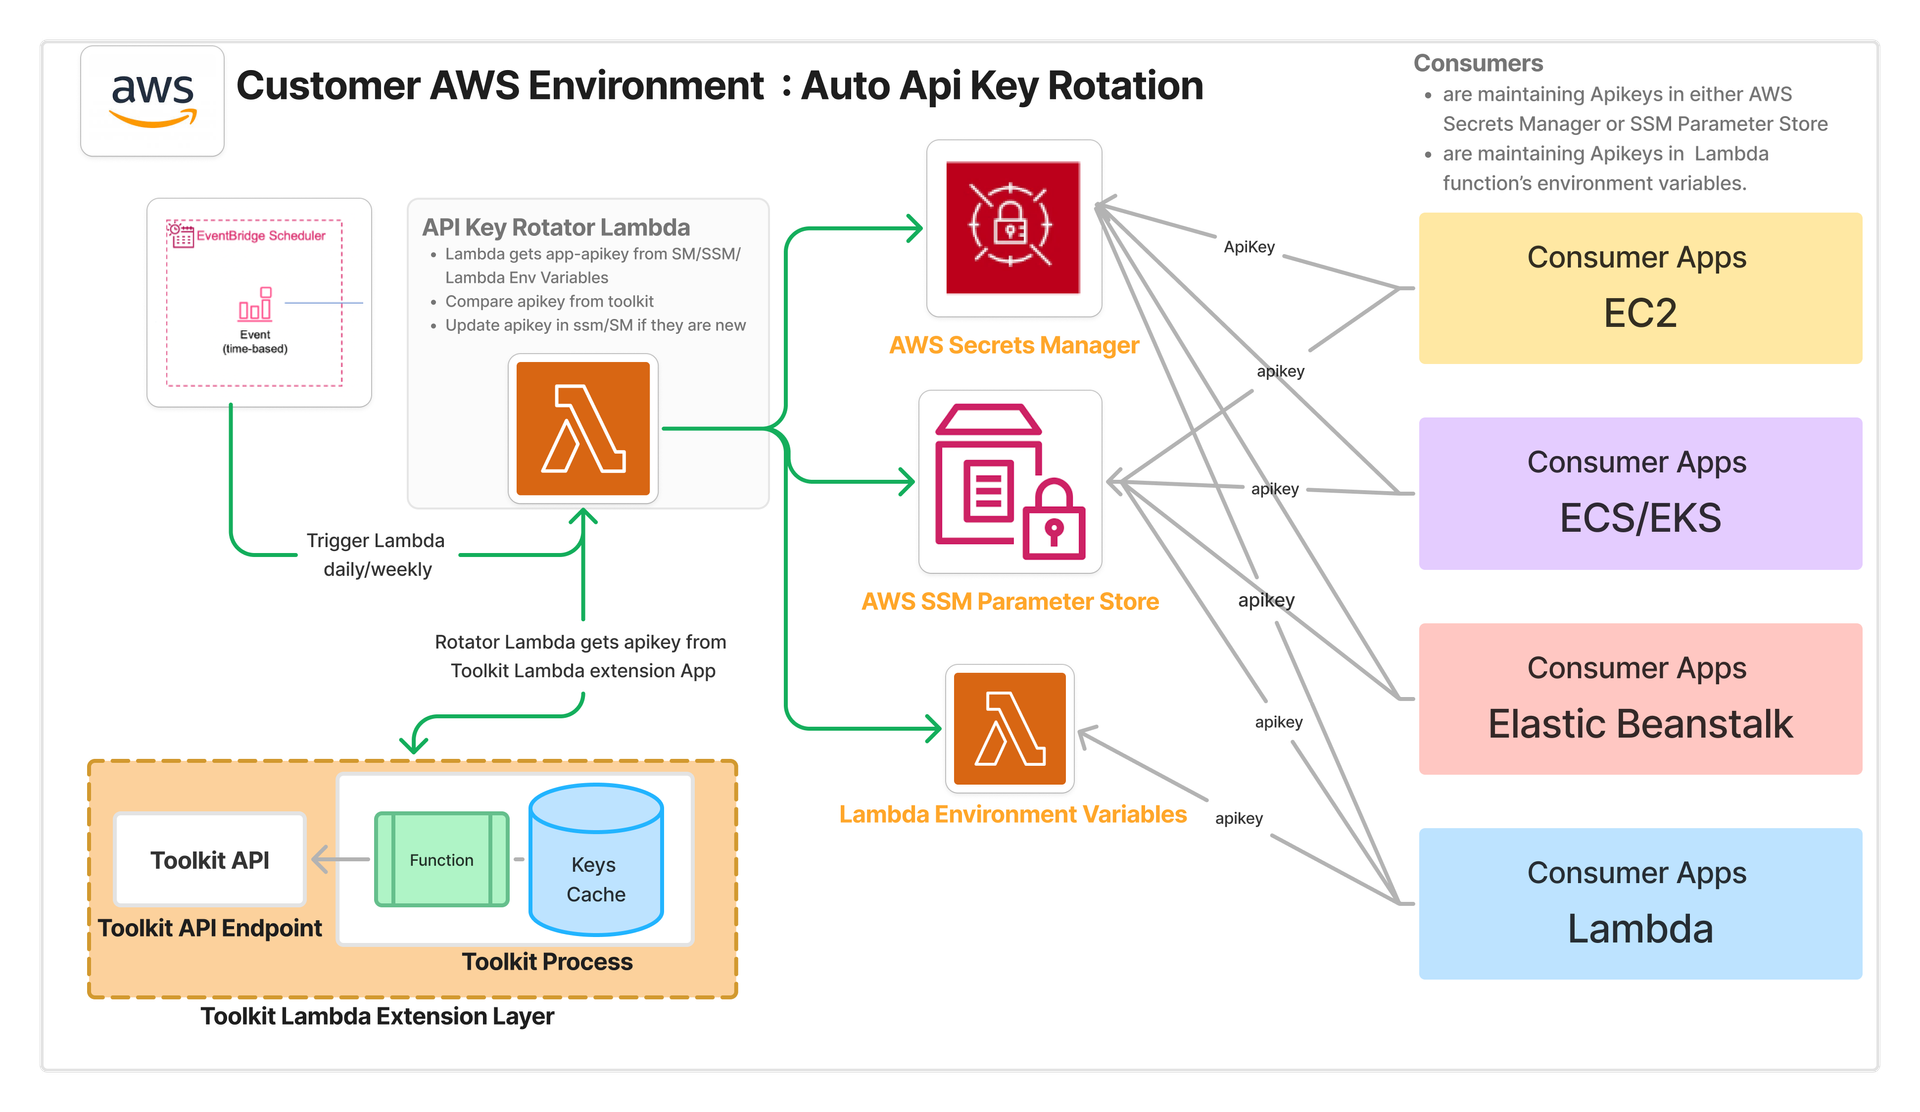
Below diagram illustrates the high level design flow
- Consumer apps are running anywhere in the AWS environment, such as ECS, EKS, Elastic Beanstalk, Lambda, EC2, etc.
- These apps are fetching API keys from Secrets Manager, SSM Parameter Store, or Lambda environment variables.
- Consumers use Event Bridge, API Key Rotator, and Toolkit Lambda Extension to rotate API keys in these services.
- Event Bridge Scheduler triggers API Key Rotator weekly once.
- API Key Rotator retrieves app names from Secrets Manager, SSM Parameter Store, or Lambda environment variables and calls the Toolkit app for new API keys.
- Toolkit App renews the API key in APIM if it's within the expiration SLA and provides the new key.
- API Key Rotator compares the current API key with the new one from the Toolkit app. If they don't match, it updates the key in Secrets Manager, SSM Parameter Store, or Lambda environment variables.
We recommend using this integration pattern for automating API key rotation for consumer applications.
1. Go to Dashboard and Navigate to the "View API Credentials" section.
2. Download Toolkit using "Toolkit" button from API Key Rotation Instructions page.
Please use our API Key Rotator solution specifically tailored for Azure by downloading “API Key Rotator“ Zip (anywhere-azure-apikeyrotator-toolkit.zip) from "Azure - API Key Rotator” section.
Demo Video - API Key Rotator for Azure (This demo video provide step by step installations for API Key Rotator Step)
Installation Instructions- Please find below detailed installation instructions (already covered in demo video) for implementing our automated key rotator solution.
Installation Steps to Register and Initialize the Toolkit:
Step 1: Download ‘Company Details Configuration’, ‘UUID’ and ‘API Key Rotator App’ from Developer Portal:
- Download the Company Details Configuration file from the “AZURE - API Key Rotator” section located on the right section.
- While downloading, you will be provided ToolkitUUID. Please note it. The same is available in “My Integration Page.”
- Download “API Key Rotator” zip file (anywhere-azure-apikeyrotator-toolkit.zip) from the “AZURE - API Key Rotator” section. This zip file contains ‘azureapikeyrotator.zip’ and ‘sampleAppsMapReq.json’.
Step 2: Create Application Mapping Request According to Your Apps Configuration:
- Unzip the anywhere-azure-apikeyrotator-toolkit.zip file and locate the sampleAppsMapReq.json file. Use this file to create your apps mapping JSON request.
- Follow instructions in the _readme section within sampleAppsMapReq.json.
- Map your apps stored in Azure Key Vault, Azure App Configuration, Azure Function App environment variables, Azure WebApp, and Azure Static WebApp to Apigee app names.
- Refer to the Azure ApiKey Rotator Demo Video for detailed guidance on mapping your apps to Apigee.
Step 3: Setup ‘ApiKey Rotator Function’ and Deploy Apikey Rotator App:
- Navigate to your Azure Function in the Azure Portal.
- Create a Node.JS Function App and name it descriptively, such as ApiKeyRotatorFunction, in accordance with your naming standards. (Make sure runtime of the function app should be NodeJS ).
- Please note: you need to install Azure CLI tool on your machine, follow this link to install Azure CLI tool: https://learn.microsoft.com/en-us/cli/azure/install-azure-cli
Deploy the ApikeyRotator Function using the following commands in your terminal to deploy the azureapikeyrotator.zip function app
# Log in to Azure
az login# Deploy the function app
az functionapp deployment source config-zip --resource-group MyResourceGroup --name MyFunctionApp --src azureapikeyrotator.zip
Step 4: Configure Environment Variables:
- API_KEY_ROTATION_SCHEDULE: '0 0 6 * * 2' (Default to weekly, Tuesday at 6:00 AM UTC).
- APIKEYROTATIONAPPS: A JSON string that contains your app mappings. If your app mappings exceed the limit of one Azure function environment variable, you can split them into additional variables: APIKEYROTATIONAPPS2 and APIKEYROTATIONAPPS3.
- COMPANYDETAILS: Encrypted company details which you downloaded from Step 1.
- TOOLKITUUID: Toolkit UUID value which you captured from Step 1.
- TOOLKIT_APP_URL: URL of the Toolkit App API. Replace your function app name (e.g.,
https://<your-function-app-name>.azurewebsites.net/api/ToolkitApp). - Please Note: Configure the Azure Function App with Necessary Permissions, You may need to collaborate with your Azure Admin to obtain these permissions
Step 5: Test API Key Rotator Function and Verify Logs:
- Validate Environment Variables: Ensure the APIKEYROTATIONAPPS environment variable contains valid app mappings.
Test the Function:
# Test ToolKit App
curl -L -X POST 'https://<Your Key Rotator function app name>.azurewebsites.net/api/ToolkitApp' -H 'Content-Type: application/json' -d '{"appName":"APIKeyRotator_TestApp1_Sandbox"}'# Test ApiKey Rotator App
curl -L -X GET 'https://<Your Key Rotator function app name>.azurewebsites.net/api/ApiKeyRotator'- Verify Logs: Check the Azure Function App logs in the Azure Portal or via Application Insights.
Sample Logs :
{
    "successes": [
        {
            "type": "APPLICATION_API",
            "httpURL": "https://dev1.api.anywhere.re/TestAPI2DonotDelete",
            "AppName": "referenceapi-prd-apikey",
            "ApiKey": "Ja3rilxxxxxxxxxxxxx",
            "Message": "App found in Apigee and sent apikey to RestAPI.",
            "APIMAppName": "ApiKeyRotator_TestApp3_Sandbox"
        }
    ],
    "warnings": [
        {
            "type": "APP_CONFIG",
            "appName": "APIKeyRotator_TestApp1_Sandbox",
            "message": "No update needed for \"healthcheck-sbx-apikey\" in AppConfiguration for app APIKeyRotator_TestApp1_Sandbox."
        }
    ],
    "errors": [
        {
            "type": "KEY_VAULT",
            "appName": "APIKeyRotator_TestApp1_Sandbox",
            "message": "ChainedTokenCredential authentication failed.."
        }
    ],
    "timestamp": "2025-04-14T12:31:09.486Z"
}
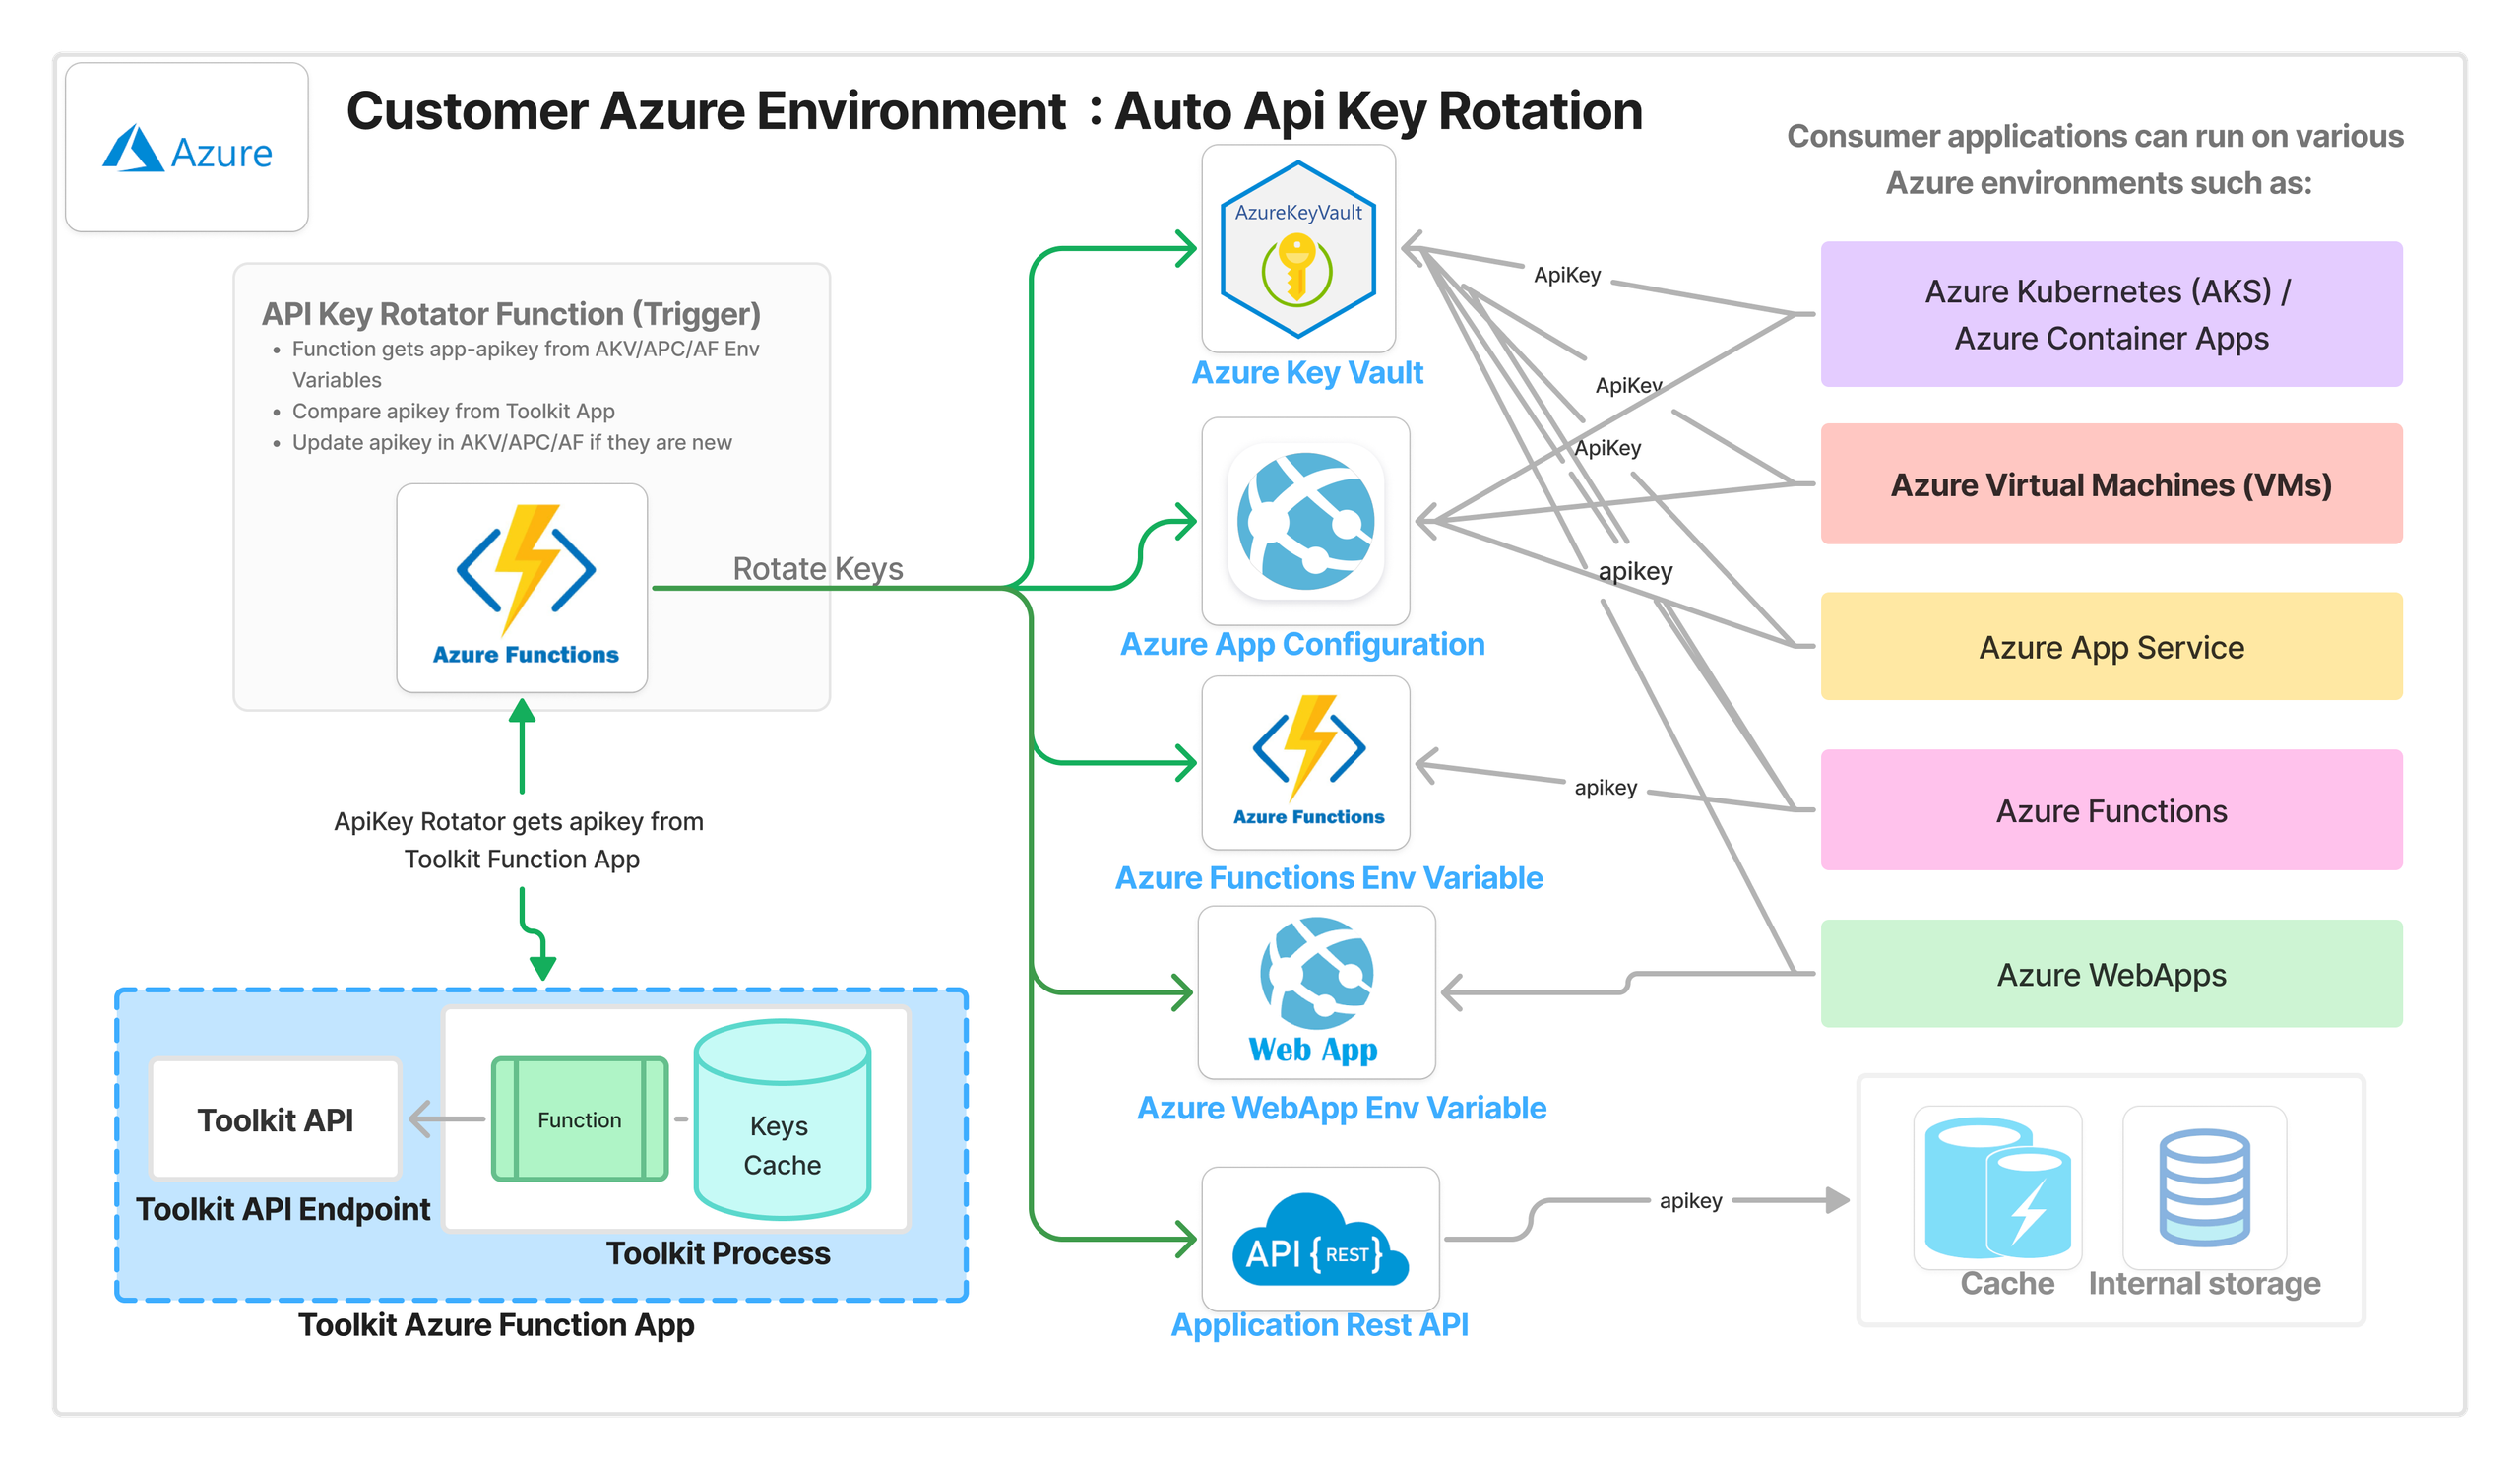
High-Level Design Flow:
- Consumer Apps: Consumer applications run anywhere within the Azure environment, such as Azure WebApp, Azure Static WebApp, Azure Kubernetes Service (AKS), Azure App Service, Azure Functions, Azure Virtual Machines (VMs), and Azure Container Apps.
- API Key Storage: Consumer apps retrieve API keys from Azure Key Vault, Azure App Configuration, Azure Functions environment variables, Azure WebApp Environment Variables.
- Key Rotation Process:
- Consumers utilize the API Key Rotator Function and Toolkit App Function Extension to automate API key rotation.
- The API Key Rotator Function triggers once a week.
API Key Rotation Workflow:
- The API Key Rotator function reads the apps' mapping data and fetches app names from Azure Key Vault, Azure App Configuration, Azure WebApp Environment Variables, or Azure Functions environment variables.
- It then calls the Toolkit App, which generates a new API key.
- The Toolkit App renews the API key in APIM (APIGEE) if it is within the expiration SLA and provides the new key.
- The API Key Rotator function compares the current API key with the new one from the Toolkit App. If they don't match, it updates the key in Azure Key Vault, Azure App Configuration, Azure WebApp Environment Variables, or Azure Functions environment variables.
- Consumers can use the ApiKey Rotator function to send the latest API key to their Application API, which will then update the key in their cache, database, or configuration files.
1. Go to Dashboard and Navigate to the "View API Credentials" section.
2. Download Toolkit using "Toolkit" button from API Key Rotation Instructions page.
Demo Video - API Key Rotator for Local/On-Prem (This demo video provide step by step installations for Toolkit App)
Integration Toolkit Installation
Please download the integration toolkit and follow the instructions below to register and initialize the toolkit.
The installation script verifies the following necessary packages and installs them if not available:
i. Installs the Forever package globally.
ii. Install the necessary NPM dependencies for the Toolkit.
iii. Initializes the Toolkit with the provided Toolkit UUID on the default port 3000.
Prerequisites:
Node.js: Ensure you have Node.js version 17 or later installed on your machine. Download it from: https://nodejs.org/en/download
Forever: The installation script automatically installs the forever tool if not available on your machine. Please ensure forever tool is installed correctly with the command:
forever -help
Unzip & Install Toolkit:
Unzip the downloaded toolkit folder.
Open a command prompt in the toolkit directory.
Execute the below start script, and follow onscreen instructions to install the necessary packages.
startToolkit.cmdWhen prompted to “Enter Toolkit ID”, supply a valid Toolkit UUID, Instance name, and Port to initialize the toolkit.
Note: If the port is not supplied, the toolkit runs on default port 3000.
<toolkitUUID> --port <port-number>e.g. 2bfe93ec-b040-4043-b26b-a8f6110d2ad6 --port 3001
Troubleshooting:
If you encounter any issues while initializing the toolkit, please check the troubleshooting section in this document.
How to Get apiKey
Please run the following to get the apiKey
curl -X POST https://localhost:<portnumber>/getkey -H "Content-Type: application/json" -d "{\"appName\":\"<appname>\"}" -kPlease use your <app name> - app name from "View API Credentials" and <portnumber> is the port that port number of the initialized toolkit (3000 is the default port number)
Stop Toolkit:
If you need to stop the toolkit, then run the below command.
forever stopallNote: The above command stops all running forever processes.
If you want to stop a particular process. Please follow the below instructions:
List all forever processes:
forever listGet ‘uid’ of the intended process and use the below command to stop the process.
forever stop <uid>e.g. forever stop 1
Troubleshooting:
Error: Failed to install forever globally
Possible cause: You might not have sufficient privileges to install the forever module globally.
Solution: Please seek assistance from your IT Admin to install the forever module globally.
Error: Port already in use!
Possible cause: The toolkit is already running on the default port (3000).
Solution: If you want to run the toolkit on a different port, re-run the toolkit command with the desired port number: <toolkit uuid> --port <port-number>
Error: Incorrect Toolkit UUID has been provided
Possible cause: You’ve provided an invalid Toolkit UUID.
Solution: Obtain a valid Toolkit UUID by navigating to the “Dashboard > Credentials > My Integration Toolkit” page on the Anywhere Developer Portal: Anywhere Developer Portal
URL: https://developers.anywhere.re/my-integration-tool-kit-listError: if you see the continuous message "... Verifying prerequisites... "
Possible cause: Cached input data may be causing the problem.
Solution: Close and re-open the command prompt or terminal window, then re-run the start script.
If you still encounter issues with the startToolkit script, you can run the following commands manually.
Install forever globally.npm install forever --globalInstall the necessary packages.
npm installInitialize the Toolkit:
npm run toolkit <Toolkit-UUID> --port <port-number>
e.g. npm run toolkit 2bfe93ec-b040-4043-b26b-a8f6110d2ad6 --port 3001Remember to replace <Toolkit-UUID> and <port-number> with the actual values.
Integration Toolkit Installation
Please download the integration toolkit and follow the instructions below to register and initialize the toolkit.
The installation script verifies the following necessary packages and installs them if not available:
i. Installs the Forever package globally.
ii. Install the necessary NPM dependencies for the Toolkit.
iii. Initializes the Toolkit with the provided Toolkit UUID on the default port 3000.
Prerequisites:
Node.js: Ensure you have Node.js version 17 or later installed on your machine. Download it from: https://nodejs.org/en/download
Forever: The installation script automatically installs the forever tool if not available on your machine. Please ensure forever tool is installed correctly with the command:
forever -helpUnzip & Install Toolkit:
Unzip the downloaded toolkit folder.
Open a command prompt in the toolkit directory.
Execute the below start script, and follow onscreen instructions to install the necessary packages.
chmod 755 startToolkit.sh
  ./startToolkit.sh
When prompted to “Enter Toolkit ID”, supply a valid Toolkit UUID, Instance name, and Port to initialize the toolkit.
Note: If the port is not supplied, the toolkit runs on default port 3000.
<toolkitUUID> --port <port-number>e.g. 2bfe93ec-b040-4043-b26b-a8f6110d2ad6 --port 3001
Troubleshooting:
If you encounter any issues while initializing the toolkit, please check the troubleshooting section in this document.
How to Get apiKey
Please run the following to get the apiKey
curl -X POST https://localhost:<portnumber>/getkey -H "Content-Type: application/json" -d "{\"appName\":\"<appname>\"}" -kPlease use your <app name> - app name from "View API Credentials" and <portnumber> is the port that port number of the initialized toolkit (3000 is the default port number)
Stop Toolkit:
If you need to stop the toolkit, then run the below command.
forever stopallNote: The above command stops all running forever processes.
If you want to stop a particular process. Please follow the below instructions:
List all forever processes:
forever listGet ‘uid’ of the intended process and use below command to stop the process.
forever stop <uid>e.g. forever stop 1
Troubleshooting:
Error: Failed to install forever globally
Possible cause: You might not have sufficient privileges to install the forever module globally.
Solution: Please seek assistance from your IT Admin to install the forever module globally.
Error: Port already in use!
Possible cause: The toolkit is already running on the default port (3000).
Solution: If you want to run the toolkit on a different port, re-run the toolkit command with the desired port number: <toolkit uuid> --port <port-number>
Error: Incorrect Toolkit UUID has been provided
Possible cause: You’ve provided an invalid Toolkit UUID.
Solution: Obtain a valid Toolkit UUID by navigating to the “Dashboard > Credentials > My Integration Toolkit” page on the Anywhere Developer Portal: Anywhere Developer Portal
URL: https://developers.anywhere.re/my-integration-tool-kit-listError: if you see the continuous message "... Verifying prerequisites... "
Possible cause: Cached input data may be causing the problem.
Solution: Close and re-open the command prompt or terminal window, then re-run the start script.
If you still encounter issues with the startToolkit script, you can run the following commands manually.
Install forever globally.npm install forever --globalInstall the necessary packages.
npm installInitialize the Toolkit:
npm run toolkit <Toolkit-UUID> --port <port-number>
e.g. npm run toolkit 2bfe93ec-b040-4043-b26b-a8f6110d2ad6 --port 3001Remember to replace <Toolkit-UUID> and <port-number> with the actual values.
Manual Key rotation option will be enabled for you 45 days before Apikey expiry. You will be notified of the same via automated email. You will only be able to renew key until the day of the expiry.
If you prefer manual renewal, follow these steps:
Log in to the Anywhere Developer Portal.
Click the Profile section and select the Dashboard icon.
Navigate to the Credentials tab and select "View API Credentials" option.
Find your app and Click the Renew Key icon (visible 45 days before expiry).
Copy and update the new API key in all applications where it’s used.
Please refer to below demo video.
Demo Video for Manual API Key Rotation - This demo video provides step by step instructions for Manual API Key Rotation